2 - Using the Machines
2.1 - Accessing the Machines
2.1.1 - SSH
The access to the machines is made via SSH, with the command
ssh user@hostname.domainwhere user is your username, hostname is the machine's name, e.g., tejo, and domain is the cluster's domain, i.e., mlkd.tp.vps.inesc-id.pt.
2.1.2 - SSH Key Authentication
For security reasons, authentication is made via SSH keys rather than password. You can generate an SSH key pair with the ssh-keygen command. To learn more about SSH key authentication, please refer to this page (opens in a new tab).
2.1.3 - SSH Config
To simplify access to the machines and allow the use of some extensions mentioned later in this guide, you should edit your .ssh/config file, to include the following block:
Host douro lima mondego sado tamega tejo zezere
HostName %h.mlkd.tp.vps.inesc-id.pt
User <user>
IdentityFile ~/.ssh/<private_key>
where <user> should be replaced by your username, and <private_key> should be replaced by the name of your private key.
After this, you will be able, for example, to use ssh tejo instead of ssh user@tejo.mlkd.tp.vps.inesc-id.pt.
2.2 - Accessing Remote Files - SSHFS
SSHFS allows you to mount remote files and folders locally over SSH, allowing to access them as if they were stored in your local machine. The generic SSHFS command is
sshfs user@machine:remote_path local_pathwhere user is your username, machine is the server's address, remote_path is the path to the file/folder in the server, and local_path if the path where you want to mount the file/folder locally.
E.g., if you want to mount your cluster's homedirectory in the mountpoint folder of your local machine's desktop, you should first create the latte, and then use the command
sshfs user@machine:~/ ~/Desktop/mountpoint2.3 - Transferring Files
Secure file transfer between your local machine and the cluster can be made with either SCP or SFTP, which both run on top of SSH.
Since it does not acknowledge every received package, SCP is generally much faster than SFTP. However, it comes with a tradeoff, since SCP does not allow resuming file transfers, and SFTP does.
Additionally, while SCP is built purely for file transfers, SFTP has a multiple other functionalities, such as creating and deleting files and directories, and listing directories.
For more information on SCP and SFTP, refer to this page (opens in a new tab).
2.3.1 - SCP
With source_path being the path to the files you want to copy, dest_path being the path where you want to copy the files to, and -r being an optional flag that allows transferring olders through recursive file transfer, the generic SCP command is:
scp -r source_path dest_pathGenerally, this command should be run on your local machine, since unless you have a public IP, the remote machine won't be able to find the path to your local one.
In particular, if you are transferring from your local machine to the remote one, you should use
scp -r local_path user@machine:remote_pathIf you are transferring from your remote machine to your local machine, you should go for
scp user@machine:remote_path local_pathIn both cases, user is your username and machine is the server's address, e.g., tejo.mlkd.tp.vps.inesc-id.pt.
2.3.2 - SFTP
SFTP's file transfer API is similar to the SCP one described above. For additional information on SFTP, please refer to this page (opens in a new tab).
2.4 - Package Environments
A Python environment is a self-contained directory that contains all the necessary libraries and dependencies. Python environments decouple and isolate different Python installs, allowing you to install and manage your packages independently from system packages and other environments, and making it easier to keep track of the packages needed to replicate a project's environment.
The use of environments is highly recommended, and we suggest the following environment managers:
- conda (opens in a new tab) - very complete cross-platform package and environment manager
- venv (opens in a new tab) - lightweight built-in Python 3 module. Simple, fast and easy to use
- pypoetry (opens in a new tab) - dependency manager and build tool for Python projects. Fast, but more complex than venv
In this guide, we only cover the basic usage of the Anaconda environment manager. However, you can use whichever environment manager you choose to.
2.4.1 - Anaconda Environments
Anaconda is a very complex and complete environment and package manager. Below, is a list of the main commands you'll ever need to know to use it. For more information, refer to this page (opens in a new tab).
- Create an environment -
conda create -n env_name - Delete an environment -
conda env remove -n env_name - Activate an environment -
conda activate env_name - Deactivate an environment -
conda deactivate - Package installation
conda install package_name- slow, but checks all dependencies and detects conflictspip install package_name- fast, but no dependency conflict detection
- Exporting an environment
conda env export > environment.yamlpip freeze > requirements.txt
- Importing an environment
conda env create -f environment.yamlpip install -r requirements.txt
2.5 - Detaching Processes from SSH Sessions
When you run scripts within an SSH session, the associated processes are attached to that session, and should your SSH session disconnect, they will be killed. To avoid this, you need to detach your processes from the SSH session, allowing them to keep running, even if the SSH sessions breaks.
This can be achieved with tmux and screen, which create virtual terminal sessions that you can detach from your SSH session and attach back to later, and nohup, which executes another command and instructs the system to continue running it even if the session is disconnected.
2.5.1 - tmux
There is a plethora of things you can do with tmux. Here, we'll cover those you need to run processes in virtual terminal sessions. Refer to this page (opens in a new tab) for more functionalities.
- tmux new - creates a new
tmuxsession - ctrl+b d - detaches from the current
tmuxsession, leaving child processes running in the background - tmux ls - lists all active
tmuxsessions - tmux attach -session_name - attaches back to the given
tmuxsession - ctrl+d - kills the current
tmuxsession
2.5.2 - screen
As well as with tmux, there is a plethora of things you can do with screen. Yet, here we'll only cover those you need to run processes in virtual terminal sessions. Refer to this page (opens in a new tab) for more functionalities.
- screen - starts a new
screensession - ctrl+a d - detaches from the current
screensession, leaving child processes running in the background - screen -list - lists all active
screensessions - screen -rd session_id - attaches back to the given
screensession, detaching it first, if necessary - ctrl+d - kills the current
screensession
2.5.3 - nohup
Unlike tmux and screen, which have multiple other functionalities, nohup only serves the purpose of instructing the system to keep running a process even if the session is disconnected.
To run a command with nohup and send it to the background, you should execute
nohup mycommand &All output, including error messages, will be written to the file nohup.out in your current working directory. To bring the process back to the foreground, you can use the fg command. To send it back to the background, run ctrl+z followed by bg.
2.6 - VS Code
One simple way to use the machines is through VS Code and it's multiple extensions, in particular, the remote SSH extension, which lets you work on a remote machine through a local VS Code instance.
2.6.1 - VS Code Remote SSH
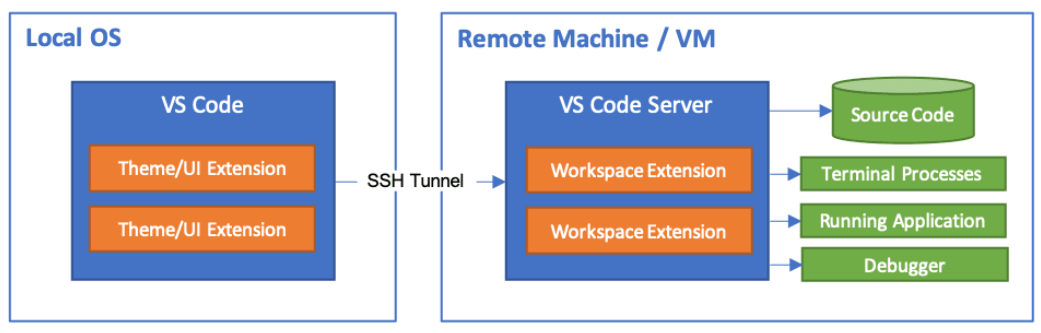
The VS Code Remote SSH extension establishes and SSH session between your local VS Code instance and a remote machine, allowing you to work on the remote machine using VS Code's familiar interface.
This allows you to use the same VS Code interface and plugins you are used to, access and edit remote files as if they were stored locally, and seamlessly run code on remote machines, as if you were doing it locally.
After installing the Remote SSH extension, follow the steps below to connect to a machine for the first time.
-
In VS Code's command palette (
Ctrl+Shift+P) choose theRemote-SSH: Connect Current Window to Host...command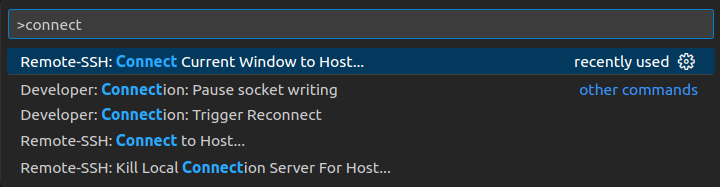
-
Choose the SSH host previously configured in
~/.ssh/config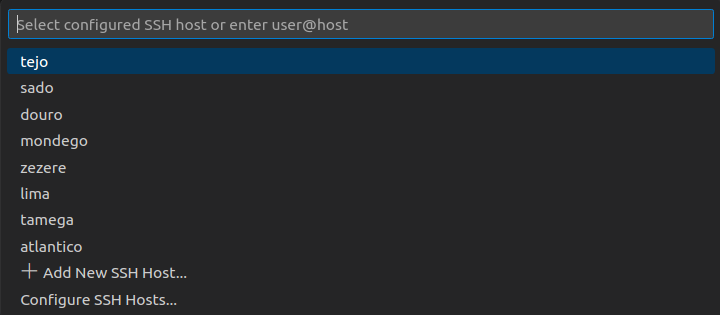
-
If VS Code cannot automatically detect the type of server you're connecting to, set it manually. Typically, it will be Linux, but check with the cluster administrator if in doubt

-
VS Code will connect to the server and set itself up. After a while, the status bar on the bottom left of the screen will turn green, meaning you are connected to the server
Some problems to be aware of when using VS Code's Remote SSH extension:
- Unable to connect after VS Code update
- Login using SSH from a terminal
- Kill all processes related to VS Code and reconnect
- VS Code leaves processes running after closing
- Regularly kill all processes related to VS Code
2.6.2 - Other VS Code Extensions
Apart from Remote SSH, VS Code has multiple other useful extensions. Some of them are:
- autoDocstring
- Generates Python docstrings automatically
- GitHub Copilot
- Provides autocomplete-style suggestions as you code. You can receive suggestions either by starting to write the code you want to use, or by writing a natural language comment describing what you want the code to do
- GitLens
- Helps visualize git repo metadata, such as code authorship, allows to seamlessly navigate and explore Git repositories, gain valuable insights via rich visualizations and powerful comparison commands, and much more
- Jupyter
- Provides basic notebook support and allows any Python environment to be used as a Jupyter kernel
- Jupyter Notebook Renderers
- Provides renderers for Jupyter Notbook outputs
- Python
- Support for the Python language including features such as IntelliSense (Pylance), linting, debugging, code navigation, code formatting, refactoring, variable explorer, test explorer, and more
2.7 - Useful Commands
2.7.1 - htop
htop is a process viewer for Linux. It allows you to see all processes running on the system, their CPU and memory usage, and their full command lines. It also allows killing processes, stopping them, and sending them other signals.
For more info on htop, refer to this page (opens in a new tab) or the manual page (man htop).

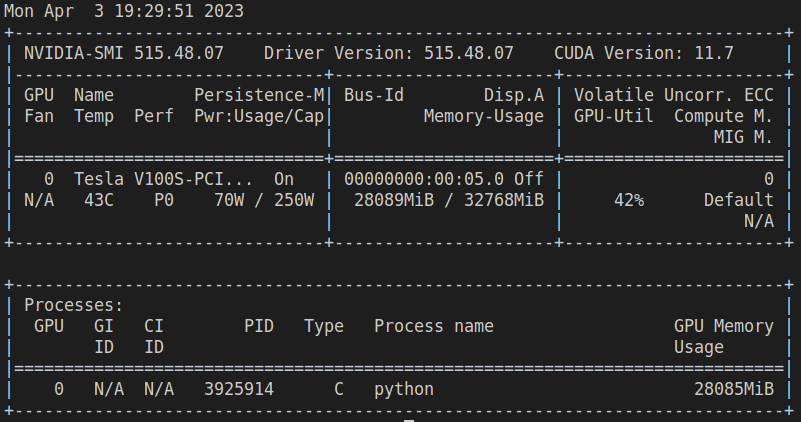
2.7.2 - nvidia-smi
nvidia-smi provides monitoring and management capabilities over NVIDIA GPUs. Among other information, it displays the processes running on each GPU, their memory usage, and the percentage of GPU compute capacity in use at each moment.
You can read more about nvidia-smi on its manual page - man nvidia-smi.
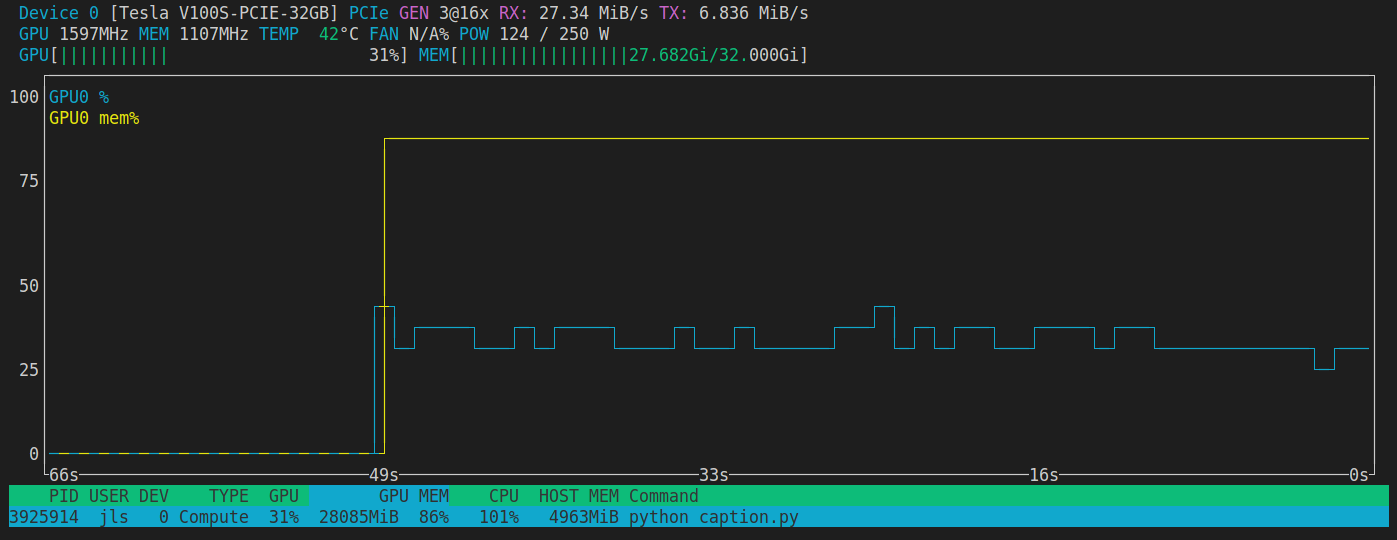
2.7.3 - nvtop
nvtop is a GPU status viewer for AMD, Intel and NVIDIA GPUs. Unlike nvidia-smi, which displays static information corresponding to the point in time when it was executed, nvtop displays information dynamically.